In today's digital age, setting up P2P SSH on a Raspberry Pi for free has become an essential skill for tech enthusiasts and professionals alike. Peer-to-peer (P2P) connections and SSH tunnels provide a secure and efficient way to access remote systems, manage files, and execute commands. Whether you're a beginner or an experienced developer, this guide will walk you through every step of the process, ensuring you can set up your Raspberry Pi securely and effectively.
SSH, or Secure Shell, is a cryptographic network protocol that enables secure communication between devices over an unsecured network. By leveraging the power of Raspberry Pi, users can create a cost-effective solution for managing servers, automating tasks, and even hosting applications. This article will delve into the specifics of setting up P2P SSH on Raspberry Pi without requiring any paid services.
Our goal is to provide you with actionable insights and practical steps to achieve seamless P2P SSH connectivity. Whether you're setting up a home automation system or accessing remote files, this guide will empower you with the knowledge and tools to accomplish your objectives efficiently. Let's dive in!
- Hd Hub Bollywood Your Ultimate Destination For Bollywood Entertainment
- Hdb4u Movie Com Your Ultimate Guide To Streaming And Downloading Movies
Table of Contents
- Introduction to SSH
- Raspberry Pi Overview
- Benefits of P2P SSH
- Setup Process
- Optimizing P2P Connections
- Troubleshooting Common Issues
- Enhancing Security
- Advanced Techniques
- Conclusion
Introduction to SSH
SSH (Secure Shell) is a protocol designed to provide secure communication between two devices over a network. It encrypts all data exchanged between the client and server, ensuring confidentiality and integrity. For users looking to establish a P2P SSH connection, understanding the basics of SSH is crucial.
SSH operates on port 22 by default and supports various authentication methods, including passwords and public key authentication. By utilizing SSH, users can remotely manage systems, transfer files securely, and execute commands without compromising security.
Key features of SSH include:
- Movierulz Plz Page 3 The Ultimate Guide To Safely Streaming Movies Online
- Hdb4uhub A Comprehensive Guide To Your Housing Needs
- End-to-end encryption
- Support for multiple authentication methods
- Compatibility with various operating systems
Raspberry Pi Overview
The Raspberry Pi is a compact, affordable single-board computer that has gained immense popularity among hobbyists, educators, and professionals. Its versatility and low cost make it an ideal platform for experimenting with P2P SSH configurations.
Raspberry Pi models such as the Raspberry Pi 4 and Raspberry Pi Zero W come equipped with Wi-Fi and Bluetooth capabilities, making them perfect for setting up wireless SSH connections. Additionally, their compatibility with Linux-based operating systems like Raspbian ensures a smooth setup process.
Key advantages of using Raspberry Pi for P2P SSH include:
- Low power consumption
- Compact size and portability
- Wide range of community support and resources
Benefits of P2P SSH
Setting up P2P SSH on a Raspberry Pi offers numerous benefits, including:
- Cost-Effectiveness: Unlike paid solutions, Raspberry Pi provides a free and open-source alternative for establishing secure connections.
- Flexibility: P2P SSH allows users to connect directly without relying on third-party servers, reducing latency and improving performance.
- Security: By leveraging SSH encryption, users can protect their data from unauthorized access and cyber threats.
These advantages make P2P SSH on Raspberry Pi an attractive option for individuals and organizations seeking secure and efficient communication solutions.
Setup Process
Step 1: Install Raspbian
Begin by installing the Raspbian operating system on your Raspberry Pi. Raspbian is a Debian-based Linux distribution optimized for Raspberry Pi hardware. Follow these steps to install Raspbian:
- Download the latest version of Raspbian from the official website.
- Use a tool like Balena Etcher to flash the Raspbian image onto an SD card.
- Insert the SD card into your Raspberry Pi and power it on.
Once Raspbian is installed, ensure your Raspberry Pi is connected to the internet and update the system using the following command:
sudo apt update && sudo apt upgrade
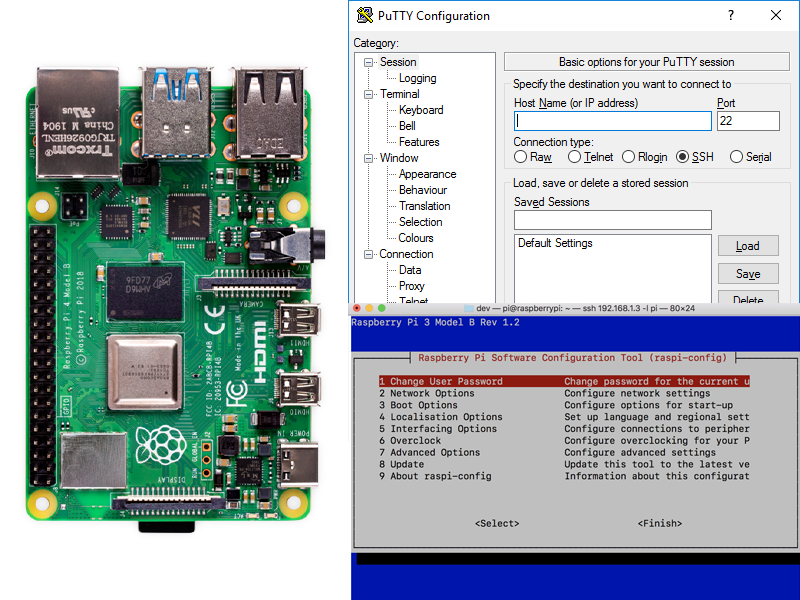
Step 2: Enable SSH
Enabling SSH on your Raspberry Pi is a straightforward process. Follow these steps:
- Open the Raspberry Pi Configuration tool by typing
sudo raspi-configin the terminal. - Navigate to the "Interfacing Options" menu and select "SSH."
- Choose "Enable" to activate SSH on your device.
Alternatively, you can enable SSH by creating an empty file named "ssh" on the boot partition of your SD card before powering on the Raspberry Pi.
Step 3: Configure SSH Keys
To enhance security, it's recommended to use SSH keys instead of passwords. Follow these steps to configure SSH keys:
- Generate a key pair on your local machine using the command
ssh-keygen. - Copy the public key to your Raspberry Pi using the command
ssh-copy-id pi@raspberrypi. - Test the connection by logging in with
ssh pi@raspberrypiwithout entering a password.
Using SSH keys eliminates the need for password-based authentication, reducing the risk of brute-force attacks.
Optimizing P2P Connections
Optimizing P2P SSH connections involves fine-tuning various settings to improve performance and reliability. Consider the following tips:
- Port Forwarding: Configure port forwarding on your router to allow incoming SSH connections.
- Compression: Enable SSH compression to reduce data transfer times.
- Keep Alive: Set the
ServerAliveIntervalparameter in your SSH client configuration to prevent disconnections during idle periods.
By implementing these optimizations, you can ensure a stable and efficient P2P SSH connection.
Troubleshooting Common Issues
While setting up P2P SSH on Raspberry Pi, users may encounter various issues. Below are some common problems and their solutions:
- Connection Refused: Verify that SSH is enabled and the correct IP address is used.
- Authentication Failure: Ensure that SSH keys are correctly configured and permissions are set appropriately.
- Timeout Errors: Check your network connection and router settings for potential issues.
Consulting the official Raspberry Pi documentation and community forums can provide additional guidance for resolving issues.
Enhancing Security
Security is paramount when setting up P2P SSH connections. Implement the following best practices to safeguard your Raspberry Pi:
- Change Default Credentials: Update the default username and password to prevent unauthorized access.
- Disable Root Login: Restrict root access via SSH to minimize potential security risks.
- Use a Firewall: Configure a firewall to block unauthorized access attempts.
By following these security measures, you can protect your Raspberry Pi from potential threats.
Advanced Techniques
For users seeking to expand their knowledge, consider exploring advanced techniques such as:
- Tunneling: Create SSH tunnels to securely access remote services.
- Port Knocking: Implement port knocking to add an extra layer of security.
- Automation: Use scripts to automate routine tasks and streamline your workflow.
These techniques can enhance the functionality and security of your P2P SSH setup.
Conclusion
Setting up P2P SSH on a Raspberry Pi for free is an excellent way to harness the power of secure communication and remote access. By following the steps outlined in this guide, you can establish a reliable and efficient connection without compromising security.
We encourage you to share your experiences and insights in the comments section below. Additionally, feel free to explore other articles on our website for more tips and tricks related to Raspberry Pi and SSH configurations.
Remember, knowledge is power, and by continuously learning and experimenting, you can unlock the full potential of your Raspberry Pi.
References
- How To Download Tv Shows Legally A Comprehensive Guide
- Zach Justice Girlfriend 2025 Unveiling The Relationship Journey